Rudy's RV-6A Pictures
Note: newer photos are here: http://albachten.com/rudy/gallery/index.php?album=aviation/rv6a
These are some pictures I took back in late March and early April 1996.
I started this project in Late January 1996, and I expect it will take me
at least 3 years to complete.
The RV-6A is sold in 4 "kits" that consist primarily of sheets of aluminum,
aluminum bar stock, and preformed aluminum channels and ribs. The first
kit is the empennage (e.g. the tail of the airplane). As of mid August
I am nearly finished with the empennage, and will soon start building the
wings.
 This is the Horizontal Stabilizer with the skins ready to rivet.
The strange looking things sticking out like porcupine quills are "cleco clamps,"
they are operated with special pliers and are used to keep the skin tight and
aligned after each hole is drilled.
This is the Horizontal Stabilizer with the skins ready to rivet.
The strange looking things sticking out like porcupine quills are "cleco clamps,"
they are operated with special pliers and are used to keep the skin tight and
aligned after each hole is drilled.
 Here is the whole Horizontal Stabilizer. It is in a simple jig so I can
make sure it is built without any twist. The skins and skeleton have
been dimpled, deburred, and primed, now it's time to rivet the skins on.
Here is the whole Horizontal Stabilizer. It is in a simple jig so I can
make sure it is built without any twist. The skins and skeleton have
been dimpled, deburred, and primed, now it's time to rivet the skins on.
 My girlfriend Laura helps me whenever I need extra hands. She is a
better riveter than I am! She is telling me to quit
taking pictures and get back to work.
My girlfriend Laura helps me whenever I need extra hands. She is a
better riveter than I am! She is telling me to quit
taking pictures and get back to work.
 These are some of the most awkward rivets on the plane. Notice how Laura
has her arm stuck under the skin so she can buck the rivets. This takes
skinny arms, good riveting skills to work by feel, and lots of patience.
Any volunteers?
These are some of the most awkward rivets on the plane. Notice how Laura
has her arm stuck under the skin so she can buck the rivets. This takes
skinny arms, good riveting skills to work by feel, and lots of patience.
Any volunteers?
 Here I am behind the finished Horizontal Stabilizer. This is the first
complete assembly, and it sure feels good to finish it. Only a couple thousand hours
to go....
Here I am behind the finished Horizontal Stabilizer. This is the first
complete assembly, and it sure feels good to finish it. Only a couple thousand hours
to go....
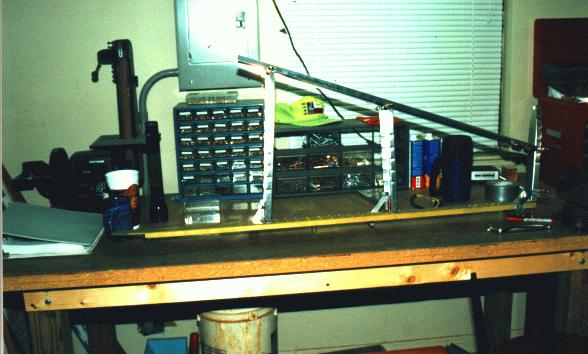
 This is the rear spar for the vertical stabilizer. It is a channel with a stiffener
riveted into the channel. I have measured, remeasured, and double checked my measurements,
then finally drilled them together.
You cleco clamp everything to the table as you go,
then remove all the clamps, debur, dimple or countersink, prime, and rivet.
This is the rear spar for the vertical stabilizer. It is a channel with a stiffener
riveted into the channel. I have measured, remeasured, and double checked my measurements,
then finally drilled them together.
You cleco clamp everything to the table as you go,
then remove all the clamps, debur, dimple or countersink, prime, and rivet.
 This is the skeleton for the vertical stabilizer - it is ready to rivet together.
Now I need to rivet it together, mount it in the jig, and start fitting the skin.
This is the skeleton for the vertical stabilizer - it is ready to rivet together.
Now I need to rivet it together, mount it in the jig, and start fitting the skin.
Back to Rudy's home page.
Send email to: rudy@albachten.com